When we go on trips, we always want to share our experiences with others once we get back home. Sometimes, the only way to capture even a tiny fraction of the experience is through photographs. It’s difficult to think of more thrilling places to take pictures than on our trips to some of the most breathtaking destinations around the world. So, how can you make the most of your ability to share these experiences? Keep reading! For those who are short on time, here is the camera I would recommend as of November 7, 2018: the Panasonic Lumix DC-LX100 II. This compact and portable camera stands out with its long-lasting battery and easy-to-handle body, even when wearing gloves.
When selecting the best camera for Mount Kilimanjaro climbs, several factors need consideration to ensure you capture stunning images while enduring the challenges of the journey. Here are key points to consider:
- Portability and Weight: Since you’ll be carrying your gear throughout the trek, opt for a lightweight and compact camera to minimize the burden. Look for mirrorless cameras or lightweight DSLRs that offer excellent image quality without adding too much weight to your pack.
- Durability and Weather Resistance: Mount Kilimanjaro’s environment can be harsh, with varying weather conditions ranging from scorching sun to freezing temperatures. Choose a camera that is ruggedly built and weather-sealed to withstand dust, moisture, and temperature fluctuations.
- Battery Life: Extended treks mean limited access to charging facilities. Select a camera with long battery life or bring extra batteries to ensure you can capture photos throughout the journey without worrying about running out of power.
- Image Quality: Aim for a camera with a high-resolution sensor and excellent low-light performance to capture the beauty of Kilimanjaro’s landscapes, including its starry nights and sunrise/sunset vistas.
- Ease of Use: Opt for a camera with intuitive controls and user-friendly interface, especially if you’re trekking at high altitudes where cognitive function may be impaired due to altitude sickness.
- Lens Compatibility: Consider the availability of compatible lenses for your chosen camera system, allowing you to adapt to various shooting scenarios, from wide-angle landscapes to close-up shots of wildlife and flora.
Based on these criteria, here are some camera options suitable for Mount Kilimanjaro climbs:
- Sony Alpha a7 III: A lightweight and compact full-frame mirrorless camera known for its excellent image quality, fast autofocus, and impressive low-light performance. Its weather-sealed body ensures durability in harsh conditions, while its long battery life allows for extended shooting sessions.
- Canon EOS RP: Another mirrorless option, the Canon EOS RP offers a lightweight and portable design with a full-frame sensor, making it ideal for capturing high-resolution images of Kilimanjaro’s stunning landscapes. Its weather-sealed construction and compatibility with Canon’s extensive lens lineup enhance its versatility for outdoor photography.
- Nikon Z50: A compact and lightweight mirrorless camera with an APS-C sensor, the Nikon Z50 combines portability with excellent image quality and fast autofocus performance. Its weather-sealed body and compatibility with Nikon Z-mount lenses make it a reliable choice for outdoor adventures like Kilimanjaro climbs.
- Fujifilm X-T4: Known for its retro design, rugged build quality, and outstanding image quality, the Fujifilm X-T4 is a versatile mirrorless camera suitable for mountain treks. Its weather-sealed body, long battery life, and wide range of compatible lenses make it well-suited for capturing the diverse landscapes of Kilimanjaro.
- Panasonic Lumix G95: A Micro Four Thirds mirrorless camera, the Panasonic Lumix G95 offers a compact and lightweight design with excellent image stabilization, making it ideal for handheld shooting during treks. Its weather-sealed construction and compatibility with a variety of Micro Four Thirds lenses enhance its suitability for outdoor photography in challenging environments like Mount Kilimanjaro.
Ultimately, the best camera for your Mount Kilimanjaro climb depends on your specific preferences, budget, and shooting requirements. Consider renting or borrowing different camera models to test them out before making a decision, ensuring you choose the one that best meets your needs for capturing memorable moments on your journey.
The Right Place. The Right Camera.
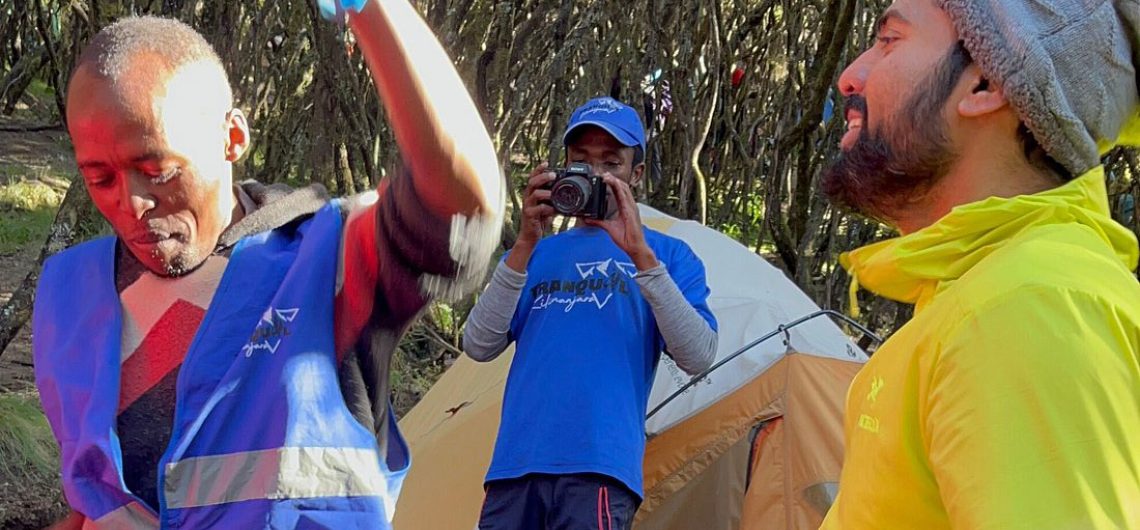
You have dedicated a whole year to preparing for your climb. You have acquired all the necessary equipment, hired a knowledgeable guide, taken time off work, and even booked your plane tickets. On top of all that, you want to document the entire experience with an exceptional new camera. Nowadays, the options available are countless and constantly changing. By the time you read this, new cameras will have been introduced to the market while others will have been phased out. This is an exhilarating time to be a photographer, and undoubtedly, your climb will present numerous opportunities to capture breathtaking images. It was, after all, the mountains that initially sparked my passion for photography. So, what are my suggestions? If you are reading this, I assume that the quality of the images is of utmost importance to you. In the past, the ideal choice would have been a Digital-SLR (DSLR) camera with interchangeable lenses. These cameras possess large sensors and are user-friendly, even when wearing gloves. Additionally, DSLRs capture RAW files, ensuring the highest quality of output. The ability to shoot in RAW format is essential if you wish to produce top-tier images. Countless books and workshops concentrate on processing the RAW output from your camera to achieve optimal results. Fortunately, a few “point-and-shoot” and compact interchangeable lens cameras have emerged which also offer the option of shooting in RAW. However, it is important to note that cameras capable of capturing RAW images come at a higher price point than basic point-and-shoot cameras currently available. It is worth mentioning that when it comes to cameras and camera accessories, quality often correlates with price. If you are genuinely dedicated to capturing high-quality images, investing as much as you feel comfortable with would be advisable. Even if you are not familiar with RAW file editing, you can configure the camera to simultaneously capture regular JPEG images and RAW files. By doing so, if you capture that once-in-a-lifetime shot, you can work with a professional printer to process and edit the RAW file in a controlled environment for impeccable results. To acquire a camera that captures RAW files, consider a high-end point-and-shoot like the Panasonic Lumix DC-LX100 II. The latest trend in the market is compact mirrorless cameras with interchangeable lenses. Although these cameras are smaller than DSLRs, they are still quite bulky and not easily pocketable. Nevertheless, their discrete nature is advantageous. If you plan to explore the streets of Moshi or interact with the Maasai, it is more tasteful to carry a small lens rather than a conspicuous “tourist” lens. Alternatively, you can opt to bring a DSLR with interchangeable lenses, which will undoubtedly provide you with the best image quality. However, consider the fact that if you have a large camera constantly residing in your backpack, you may miss out on capturing a significant number of shots. Personally, I usually carry a DSLR, but I must admit that it is incredibly liberating to travel light and the newer cameras I mentioned above perform exceptionally well. I cannot emphasize enough the importance of choosing a camera that you can comfortably use. With a high-end point-and-shoot, you can easily slip the camera into a jacket pocket and shoot with one hand, allowing your other hand to actively participate in your primary activity of climbing. Furthermore, keeping the camera warm in your pocket will help prolong the battery life. To summarize, intro-level DSLRs offer unmatched image quality at an affordable price, but they are large and bulky. I can assure you that the climber who travels with the simplest kit and the lightest backpack will have the most enjoyable experience. And now, with the advent of point-and-shoot cameras that capture RAW files, we finally have the perfect solution we’ve been waiting for! Enjoy your climb, stay safe, and bring back some extraordinary images!
Batteries
Before embarking on a lengthy expedition to the freezing peaks of the mountains, I often find myself preoccupied with the number of camera batteries needed and the best way to charge them. It would be fantastic if all cameras could utilize regular AA batteries, but unfortunately, that’s not the case. Occasionally, you may come across a few cameras in the market that do accept standard batteries, but they tend to be low-end models. Ultimately, whether you opt for proprietary or non-proprietary batteries, you will undoubtedly go through them quite rapidly. Therefore, it is advisable to choose the camera you desire and then determine your battery requirements accordingly. All of the recommended cameras mentioned here employ a rechargeable Li-ion battery, which holds its charge far better than the earlier NiCD and NiMH alternatives. It’s crucial to note that each battery has an ideal operating temperature. In the case of a typical camera battery, it functions and charges most effectively at around 70°F. Charging a Li-ion battery at temperatures below freezing can potentially harm the battery. Additionally, the battery’s capacity, measured in amp-hours, decreases as temperatures plummet – a significant concern when you’re on the mountain. However, it’s worth mentioning that rechargeable batteries stored at cold temperatures discharge at a slower pace, offering you optimal storage conditions.
Read Your Manual
The Canon 5D II camera manual provides information regarding battery life in different temperatures. At 73°F, each battery is expected to last for about 850 shots, whereas at 32°F, it decreases to 750 shots. To ensure that I have enough storage for my trip, I bring memory cards that can hold up to 2000 pictures. In colder temperatures, I find it more practical to carry three cold batteries rather than relying on a solar charger and uncertain weather conditions. The larger batteries of the 5D II are more resistant to the cold compared to smaller batteries. On the other hand, the smaller Panasonic LX100 battery, which is significantly smaller, is recommended to provide approximately 340 shots per charge. However, I personally estimate a 20% decrease in capacity for the smaller batteries in freezing temperatures, resulting in around 270 shots at 32°F. If the temperature drops even lower, it’s a matter of simple calculation to determine the battery’s performance. Even when I am in an area with frequent charging stations during my trekking trips, I make sure to carry at least three batteries for each camera system, and sometimes even six. It is important to discuss charging options with the trip director since the differences between destinations can be significant.
Some tricks of the trade:
When it comes to batteries, size matters. It is recommended to charge your batteries right before you start your journey. Opt for using the optical viewfinder option whenever it’s possible. If feasible, lower the brightness of the LCD screen. Choosing manual zoom cameras over motorized zoom ones is advisable. To conserve battery life, adjust the auto-off functions and LCD preview times to the shortest settings. If you decide to bring a small solar charging system, it is wise to contact the manufacturer and provide them with your battery specifications. However, managing expectations is crucial as the actual performance might not be as remarkable as anticipated. It’s important to note that a good charging system can often be quite expensive, so purchasing multiple batteries might be a more cost-effective solution. Lastly, a key reminder is to store your batteries in cold temperatures and use them in warm conditions.
What’s in my bag?
“Optimal illumination is essential.” This principle applies to capturing exceptional visuals during your adventures and to ensuring a pleasurable expedition. Considering the absence of stores in your destination, it becomes imperative to gather and organize all the necessary items in a compact and weightless configuration. By accomplishing this, you will facilitate your mobility, enhance your adaptability, preempt potential challenges, and ultimately indulge in a delightful experience. Embrace a minimalist and pristine approach. Regard this as a helpful reference rather than a mere inventory.
For climbs like Kilimanjaro this is what I bring:
- Canon EOS 5D Mark II with an UPstrap (upstrap-pro.com)
- Canon EF 24-105mm f/4L IS USM lens
- Singh-Ray LB polarizerLowepro
- Outback 200 Modular Beltpack
For trips like Kilimanjaro and treks in Mount Kenya, Mount Meru and Rwenzori,
- I’m not carrying as much gear on my back, so I add the following to my daily walking kit:
- Canon EF 16-35mm f/2.8L Lens
- Canon EF 70-200mm f/4L IS Lens
- Singh-Ray Vari-ND (Variable Neutral Density Filter)
- Canon Speedlite 580EX II flash with an “off camera” cord or wireless transmitter.
- Gitzo GK1580TQR5 Series 1 Traveler
- 6x Carbon Fiber Tripod
- LiteDisc Circular Reflector, White Opaque/Silver, 22″ or Photoflex LiteDisc Circular Reflector, White Translucent, 22″ for use with off camera flash Lowepro Outback 200 Modular Beltpack
Which Camera for the Serious Photographer on Kilimanjaro and Safari
The names Kilimanjaro, Serengeti, and Ngorongoro Crater evoke vivid visuals in our imaginations, even if we have never personally encountered these places. Perhaps our first glimpse of these stunning locations came from flipping through old National Geographic magazines during our childhood. These mental images could feature remarkable individuals, unparalleled wildlife, or the sheer grandeur of the tallest free-standing mountain in the world, proudly standing at a staggering height of 19,341 feet. Now, as you endeavor to convey your experience to your loved ones back home, it is inevitable that photography will play a significant role in depicting the story you are about to share.
The Extremes You Will Encounter
On Mount Kilimanjaro, it is necessary to carry all equipment, be it on your back or atop someone’s head. Moreover, the gear must be resistant to the elements. On a safari adventure, you are provided with spacious Land Cruisers and luxurious accommodations, allowing you to bring all the necessary items. However, deciding what to bring and how to pack can become quite challenging. Personally, when I travel to Tanzania, I opt for a spacious camera backpack, adhering to the maximum size permitted by the airlines. This backpack fits all my camera gear perfectly, eliminating the need for any additional luggage. The only extra piece of equipment I bring is a lightweight camera bag, which I attach to my waist while climbing. This bag is packed inside one of my checked duffels. Throughout my journey and during the safari experience, the large camera backpack remains by my side.
Equipment for Kilimanjaro:
Camera Body: When it comes to choosing a Digital SLR camera, there are many options available in the market. While I personally have my own preferences, it’s important to note that in this ever-evolving field, one thing remains constant – the phrase “you get what you pay for.” Therefore, it is advisable to invest adequate time in researching the cameras currently available and spend an amount that you feel comfortable with. Throughout my experience, I have observed that the only instance of regret among buyers is when they realize they should have opted for a higher model. To make an informed decision, there are several factors to consider, which can be viewed in no particular order of importance. These factors include the focusing speed and accuracy of the camera, the sensor size it possesses, the number of megapixels it offers, its user-friendliness, and the overall build quality. In circumstances such as being inside incredibly dusty safari vehicles, having two camera bodies can prove to be highly advantageous. This is due to the fact that not only will you save time by avoiding lens changes while photographing a lion, but it also helps in keeping your camera’s sensor and lens interiors clean. Each time you switch lenses, you expose your camera’s inner components to various types of unwanted particles that can negatively affect its performance.
Lens(es) and flash:For the climb, I have a steadfast zoom lens that maintains a consistent aperture, allowing me to capture a wide range of focal lengths from 24mm to 105mm. Occasionally, if I am feeling particularly strong, I may also bring along another zoom lens with a constant aperture ranging from 16mm to 35mm. As we ascend through various zones on the mountain, each offering unique perspectives, having a powerful flash can assist with overcoming the difficulties posed by challenging lighting conditions along the journey.
During safari trips: I prefer to use zoom lenses with a constant aperture in the telephoto range. If budget allows, a 500mm lens provides a satisfying level of zoom for capturing stunning wildlife encounters. However, there are also numerous lenses available in the more affordable 300mm to 400mm range. When in the vehicle, I typically equip one camera with a 70-200mm lens or a 100mm-400mm lens, while the other camera is accompanied by a 500mm lens. While some photographers opt to use flashes during safari to enhance the catch lights in animal eyes and such, I personally choose not to utilize this technique.
Tripod and Bean Bags: Tripods play a vital role in achieving a carefully planned composition and capturing the breathtaking beauty of sunrises and sunsets during the ascent of Kilimanjaro. When on a safari, a bean bag can be employed on the rooftop of your vehicle. Whereas, during the climb, if a cable release is unavailable, you can rely on the timer function to avoid any potential camera shake.
How to ensure that my SLR camera stays clean and protected from moisture during the Kilimanjaro Expedition? Additionally, could you suggest some mid-priced graduated neutral density filters?
QUESTION: I am interested in taking my SLR camera with me on my upcoming Kilimanjaro adventure. Can you provide me with suggestions on how to keep it clean and protected from moisture? Currently, I use a dry sack and store it in my backpack when the weather gets bad, but I believe there might be other techniques to ensure easier access. Additionally, I am in the market for a set of graduated ND filters. Specifically, I am looking for three filters with 1, 2, and 3 stops. Do you have any recommendations? My usual approach is to purchase something in the middle price range, not too cheap but not professional grade either. I am looking for a slide-in setup that can be used with different lenses. Could you kindly offer a quick recommendation? Thank you!
—James
ANSWER: James, I carry my camera in the previous generation of this bag: bhphotovideo.com…Lowepro_LP36077_PEU_Outback_200
If it starts pouring, I either tuck it under my poncho or gore-tex parka, or remove the side pouches and stuff it in my backpack until the rain subsides. I wear it on the front so it doesn’t interfere with my pack.
Lowepro also makes some chest mounted bags, which look pretty nice for super active stuff. I personally think it’s threatening to have a bunch of gear in a subjects face when taking their picture, so I opt for a bag that rides a little lower and out of the way when approaching people.
There are other bags available with rain covers, etc. but I haven’t used them. The one above has lasted me YEARS!
I possess the sing-ray split ND filters along with a Cokin P filter holder and adapter. I am not well-versed in other brands when it comes to their quality standards. Sing-ray was the pioneer in establishing this particular market many years ago. Nowadays, the prevailing practice is to manually hold the filters, disregarding the need for a filter holder. This technique helps to minimize vignetting, saves a few dollars, and is compatible with any lens. Personally, I no longer make extensive use of these filters. Instead, I suggest investing your money in lenses.
![]()